Using a microscope
Belajar sambil bermain
Jawab soal-soal ini untuk dapat energi, lalu memancing dan menjelajah. Tanpa akun.
Catatan pelajaran
Big idea: seeing the invisible
- Big idea. Key concept: Change. The microscope changed what people could see, and what they could know, about living things.
- Related concept: Models. A microscope shows us a magnified view of something tiny, and a scientific drawing is a simple model of what we see.
- Global context: Scientific and technical innovation. Better instruments lead to new discoveries.
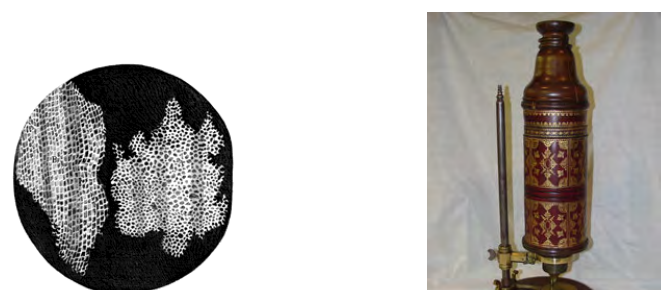
- In 1665 Robert Hooke looked at a thin slice of cork through a microscope and saw tiny box-shaped spaces. He called them cells, because they reminded him of the small rooms where monks lived.
- Soon after, Antonie van Leeuwenhoek used single lenses to see living things in pond water that no one had known existed.
- In the 1930s the electron microscope was invented. It uses beams of electrons instead of light and shows much finer detail inside cells.
Robert Hooke’s microscope and cork cells
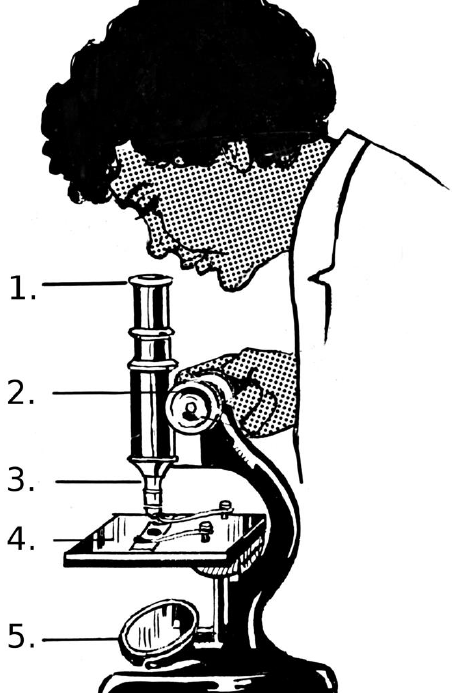
The parts of a light microscope
- A light microscope uses light and glass lenses to make tiny things look bigger.
- The eyepiece lens is the lens you look through. It is often ×10.
- The objective lenses are the lenses just above the slide. A microscope usually has three, for example ×4, ×10 and ×40. They are mounted on a turning nosepiece.
- The stage is the flat platform that holds the slide. Stage clips keep the slide still.
- The light source (a lamp or a mirror) shines light up through the specimen so you can see it.
- The coarse focus wheel makes big changes to bring the specimen roughly into focus. The fine focus wheel makes small changes to sharpen the image.
The parts of a light microscope
Using a microscope and finding the magnification
- Always carry a microscope with two hands: one on the arm and one under the base.
- Start with the lowest power objective. It gives the widest view, so the specimen is easiest to find.
- Clip the slide on the stage. Look from the side while you use the coarse focus wheel to bring the objective close to the slide without touching it.
- Then look through the eyepiece and use the coarse focus wheel to move the lens away from the slide until the image appears. Sharpen it with the fine focus wheel.
- To see more detail, swing in a higher power objective. Only use the fine focus wheel now, because the lens is very close to the slide.
- Total magnification = eyepiece magnification × objective magnification. A ×10 eyepiece with a ×40 objective gives ×400.
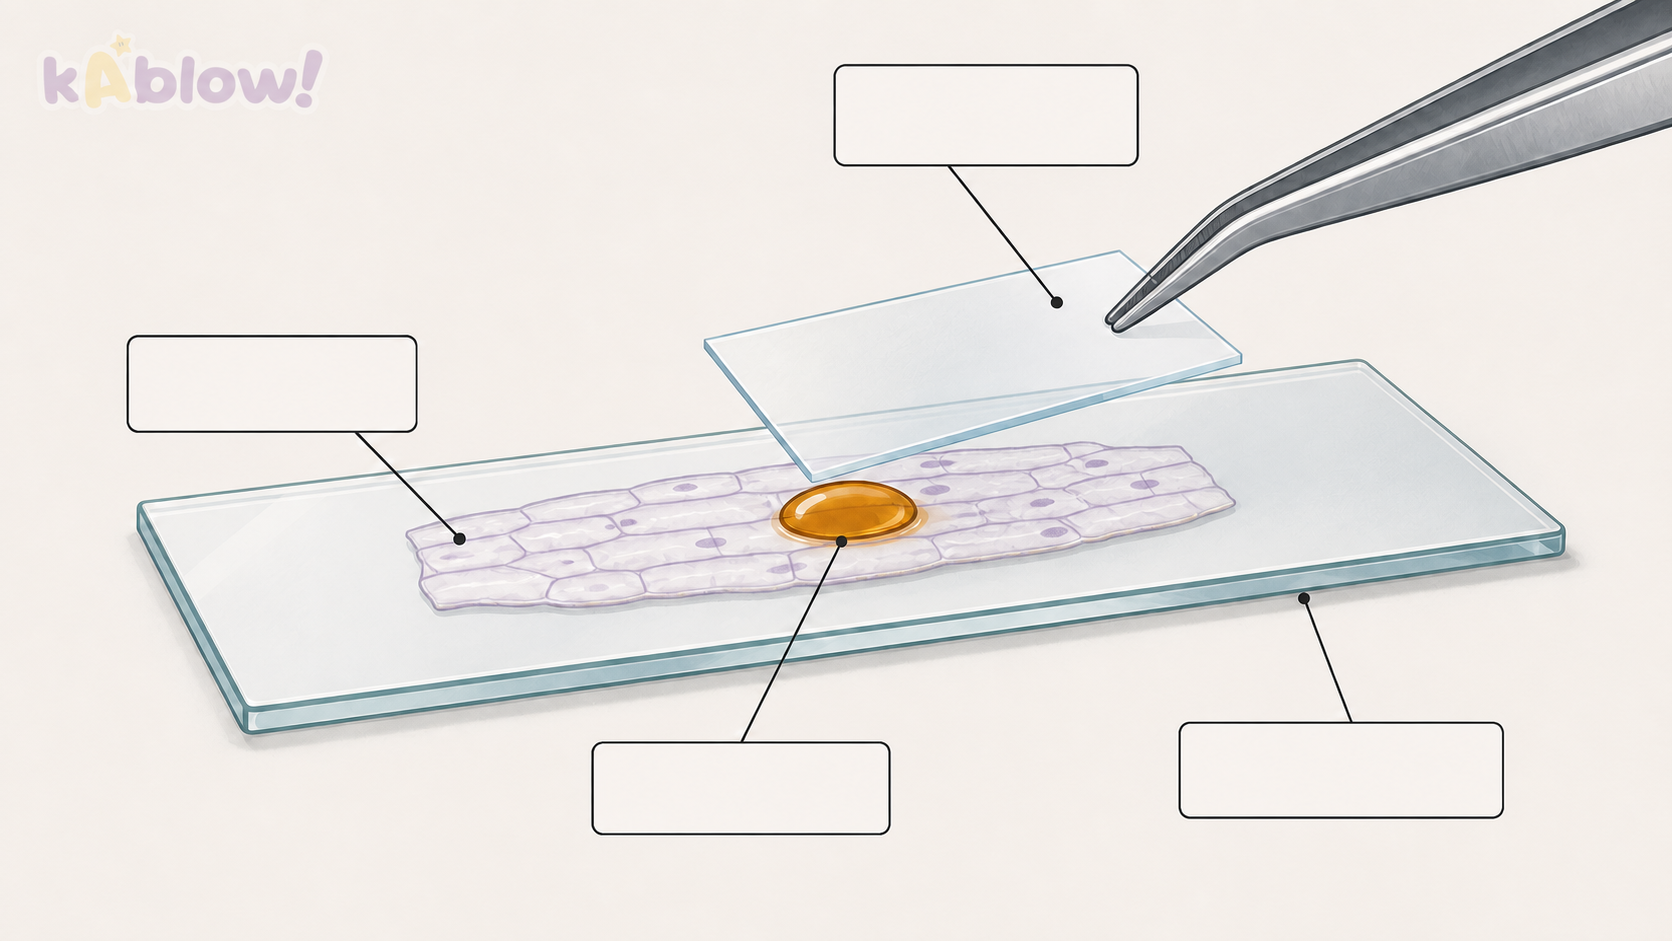
Preparing a slide
- Specimens must be thin so that light can pass through them.
- Put a drop of water or iodine solution on a clean glass slide. Iodine is a stain: it colours parts of the cell, such as the nucleus, so they stand out.
- Use forceps to peel a very thin layer of onion epidermis from the inside of an onion layer. Lay it flat on the drop.
- Hold a coverslip at an angle and lower it slowly using a mounted needle. This keeps out air bubbles, which would look like dark rings and hide the cells.
- Blot away any extra liquid with paper towel.
- Take care with glass and stains. Wash off any iodine that gets on your skin.
Preparing an onion-cell slide
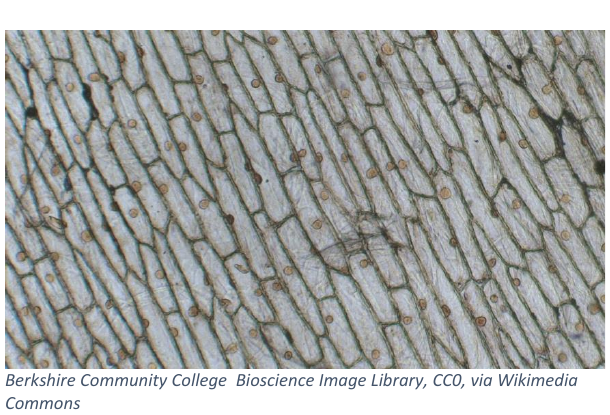
Drawing cells and working out scale
- A scientific drawing is a clear record of what you can see. Use a sharp pencil, a large simple outline and no shading or colouring.
- Draw only what is really there. Draw a few cells carefully rather than trying to copy everything.
- Label with straight lines ruled with a ruler. The lines must not cross and should touch the part they name.
- Give the drawing a title and write the magnification beside it so that others can work out the real size.
- Magnification = image size ÷ actual size. If a drawing of a cell is 40 mm long and the magnification is ×400, the actual length is 40 ÷ 400 = 0.1 mm.
- Cells are so small that scientists use micrometres (µm). 1 mm = 1000 µm, so 0.1 mm = 100 µm.
Onion epidermis cells under a light microscope
Think like a scientist: which stain works best?
- Question: does iodine or methylene blue show the nuclei of onion cells more clearly?
- The independent variable is the type of stain. The dependent variable is how clearly you can see the nuclei, which you could score out of 5.
- Control variables include the same microscope, the same objective, the same piece of onion and the same length of staining time.
- Repeat with several slides and several cells. One good-looking cell is not enough evidence.
- To evaluate your method, ask what might have made your results unreliable. Examples are air bubbles, thick peel or scoring that depends on opinion.
- Inquiry task: plan a fair test to find out which objective lens gives the clearest view of onion cells. List your variables, say how you will score clarity and describe one way to make your results more reliable.
Slide
Sign up free to view the lesson slides
Step through every slide for this topic — plus flashcards and revision notes — with a free account.
Soal latihan
Pratinjau gratis — 8 dari 53 soal. Daftar untuk melihat semuanya.
1.Which part of a light microscope do you look through?
Easy- AThe objective lens
- BThe stage
- CThe eyepiece lens
- DThe light source
2.What is the job of the stage on a microscope?
Easy- ATo hold the slide in place
- BTo shine light through the specimen
- CTo magnify the specimen ten times
- DTo move the lenses up and down
3.Which part of a microscope lights up the specimen?
Easy- AThe eyepiece
- BThe fine focus wheel
- CThe stage clips
- DThe lamp or mirror
4.Which objective lens should you use first when you start to look at a slide?
Easy- AThe highest power objective
- BThe lowest power objective
- CWhichever one is closest to the slide
- DThe one with the largest number on it
5.Why do you start with the lowest power objective?
Easy- AIt is the only lens that lets light through
- BIt magnifies the most, so the specimen is clearest
- CIt can never break the slide if it touches it
- DIt gives a wide view, so the specimen is easy to find
6.What does the coarse focus wheel do?
Easy- AIt makes tiny changes to sharpen the picture up
- BIt brings the specimen roughly into focus in big steps
- CIt changes the brightness of the lamp in the base
- DIt swaps one objective lens for another one
7.Which wheel should you turn to sharpen the picture when the ×40 objective is in place?
Easy- AThe fine focus wheel
- BThe coarse focus wheel
- CThe nosepiece
- DThe stage clips
8.What is a coverslip used for?
Easy- ATo make the specimen look a lot bigger
- BTo colour the nucleus of each cell in it
- CTo keep the specimen flat and protect the lens
- DTo hold the slide firmly on the stage
Unlock all 53 questions, flashcards & more
Buat akun gratis untuk melihat setiap soal, slide, kartu flash, dan catatan ulasan topik ini.